Showing posts with label radio station. Show all posts

30 December 2013

Newly installed Broadcast Conty


We have successfully completed the job of installing the above On-Air Studio on the 8 Jan 2014. This on-Air Studio is ready for use. Notice the mixer is embedded into the table and look more tidy without all the cables laying around/on the tabletop.

The conty is equipped with the latest professional broadcast equipment from branded name such as AKG, Allen & Heath, Warfadale, Behringer, HP workstation, Presonus, Dell workstation, Arrakis System ( Radio Assist Application ) and so on.

 Partially completed broadcast conty (refer below), just few days before Christmas ( on the 23 Dec 2013 ).
                             
As seen above, the student are trying out the soon to be completed broadcast equipment.

08 October 2013

Radio Online Streaming Part 3

Steps 3:


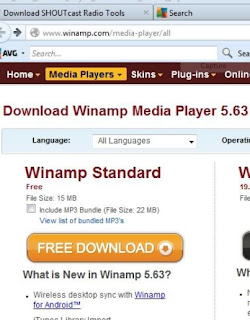
WINAMP STANDARD (to download go to http://www.winamp.com/media-player/all ) Once you have successfully downloaded the application and you may run the setup program as shown graphically below:

A ) Go to www.winamp.com/media-player/all and
Click the “ FREE DOWNLOAD” to download the
application.


 B) click OK.


C) Click “Next”


D) Click “ I Agree”


E) By default the destination folder of the
Winamp shall be located at c:\Program
Files\Winamp…you can change the location
but not necessarily, it best to leave as it is.
Click “ Next” to proceed.

22 August 2013

Online Radio Connectivity using Behringer UCA222


I found that the easiest method to connect an analog audio mixer to PC is using an audio interface and in this case I am using the UCA222 from Behringer. The UCA 222 use two sets of unbalanced RCA namely Input RCA ( L&R) and Output RCA(L&R). Download the Behringer UCA222 manual for more info. Impedance mismatch is the most troublesome problem ( i.e. Hum, distorted, imbalanced audio level ..etc.) especially if you are using external devices such as CD player, IPod, Ipad and similar to generate audio into line in of Laptop or PC. Now this can be minimized if you use UCA222. Try it to believe.


How To Configure Shoutcast


Reference:  Extracted from www.shoutcast.com/
 What is SHOUTcast?

SHOUTcast is a free-of-charge internet DJ solution. It allows anybody on the internet to broadcast audio from their PC to listeners across the globe. SHOUTcast relies on MP3 or AAC technology to deliver audio in a live situation. If you prefer to broadcast from your pc to your listeners the information below will have you broadcasting in no time. You may also switch between live and auto dj if you plan to broadcast live shows from your studio.
SHOUTcast DSP Plug-In for Winamp 5.x
SHOUTcast DSP Available

We're pleased to announce the release of SHOUTcast DSP 1.9.0. This release includes support for streaming in AAC+. Note that the client will also need to support AAC+ (we recommend last version of Winamp).

SHOUTcast DSP 2.x.x for Winamp: Download ShoutCast DSP 2.x.x
This is currently available for Windows. UNIX/Linux/etc version coming soon.
Step 1

Once the download has completed, you will need to install the software. Verify that Winamp is not running, then double click on the installer that you downloaded and follow the on-screen instructions. When the installation process has completed, start Winamp and open your preferences. Click on "DSP/Effects" in the menu to the left, and highlight "Nullsoft SHOUTcast Source DSP v2.x.x [dsp_sc.dll]". When you have selected it, a new window should pop up. You may now close your preferences window.
Step 2

Once you have highlighted the proper row, a dialog box will pop up. This is the main SHOUTcast DSP window. Here, you can configure the server, encoder, and audio settings that you will broadcast with. You can stream more then one kbps rate by setting up more then one Output account. This is common with broadcasters who wish to broadcast a high bandwidth stream for pc listeners and a lower kbps rate (like 64 kbps aac+) for listeners on mobile devices.
Step 3

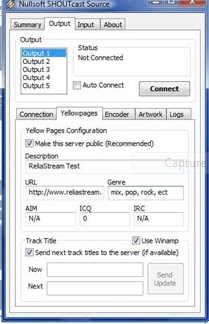
Select the "Output" tab at the top of your DSP window. Select "Output 1" under the selection box, and fill in all of the following fields properly.

Address:
Here, you need to enter the server that was given to you in the welcome email you received from ReliaStream. Your radio address will vary and it depends what server your station is set up on. be sure to look over your welcome email for all of your station details. Make sure that you put in the proper server, or else you will not be able to connect. See our example pictures.

Port:
In this field, you need to enter the port that was given to you in your welcome email. It should contain 4 numbers. Once again, this must be set properly or else you will be unable to connect.

Password:
Last, but not least, you need to set the password that was given to you in your welcome email, or the one that you changed it to. Enter this here, and make sure there are no mistakes.
Step 4
Yellowpage setup (streaming server display details) Click on the "Yellowpages" tab right above where you entered all of the previous information. If you'd like your server to be listed in the SHOUTcast directory, check the "Make this server public" box, and fill in all of the information below the box in a proper manner. If you do not have a web site you should at least enter your Stream Start Page. This is located in your radio account (under Quick Links).
Step 5
Encoder Settings (select streaming audio format) Select the "Encoder" tab at the top of your DSP window. Choose the Output # you wish to work with. If you only have one station then choose Output 1. The Encoder Type can be set to either MP3 or AAC+. In most cases it will set to MP3. If you plan to stream 64 kbps aac+ then select AAC+ as your encoder. The higher the kbps rate the better the sound quality. Only enter the kbps rate you purchased!! If you try to stream at a higher kbps rate your account will be suspended automatically. MP3 audio sounds very good and is compatible with just about every media player on the market. AAC+ is only compatible with Winamp and Windows Media Player (with a plugin), but sounds much better at lower qualities. Be sure to choose wisely. In the Encoder Settings dropdown, select the bitrate that you ordered from us, and be sure that the line you selected has "Stereo" at the end, so individual sounds will come out of both of your listeners speakers. 

Warning: If you stream at a bitrate higher than what you have ordered, your account may be deactivated or suspended by the shoutcast hosting service.

Step 6

Go back to the "Output" tab in your DSP window. Make sure "Output 1" is selected, and then click the connect button. In the status box above the button, if you are connected you should see an update in the Status section (time and then "Sent xxxx bytes"). You may have to start your radio software before connecting to get this to work properly. Make sure your radio server is ON and AUTO DJ is off or deactivated before trying to stream live. Most people having problems streaming live (99.9% of the time) have a setting wrong. Check all of your settings. If you are still having trouble connecting let us know and we will do our best to help you. Once you are connected you are ready to broadcast. Please view all of our help guides. There are many things to consider when streaming live and many things to watch out for. USA clients should choose one of our USA servers when broadcasting live. Overseas clients should choose our European server to broadcast to. Make sure you modem can handle the constant upload and make sure your modem provider allows constant uploading. If you have any questions be sure to ask our support team... Good luck and happy broadcasting!! 

Still can not figure it out? Ask us about our Remote PC Support
Remote PC Support

 If you are not able to connect to your radio server we can log into your pc remotely (but this is chargable to you) and set it up for you. The service fee for Remote PC Support is RM100. This is a per connect fee so we suggest you save the settings so we do not have to log back in. Contact us if you need this service.

Embeded Media Player on your website using HTML scripting:

<center class="style16"><strong><a target="_blank" href="http://www.YOURWEBPAGEHERE.com" mce_href="http://www.YOURWEBPAGEHERE.com">YOUR WEB SITE HERE - YOUR SLOGAN HERE </a></strong></center> <center><a target="_blank" href="http://www.ampedfm.com" mce_href="http://www.ampedfm.com">  <img border="0" src="http://www.reliastream.com/november/images/reliastreamlogo.png" mce_src="http://www.reliastream.com/november/images/reliastreamlogo.png" width="478" height="88"></a></center> <center> <span class="mceItemEmbed"  allowScriptAccess="never" allowNetworking="internal" enableJavaScript="false"    allowScriptAccess="never" allowNetworking="internal" allowScriptAccess="never" TYPE="application/x-mplayer2" PLUGINSPAGE="http://microsoft.com/windows/mediaplayer/en/download/" ID=MediaPlayer Name="mp_330916561" Width="478" Height="26" Src="http://www.reliastream.com/cast/tunein.php/ampedfmcountry/playlist.asx" mce_Src="http://www.reliastream.com/cast/tunein.php/ampedfmcountry/playlist.asx" AutoSize="1" AutoStart="1" ClickToPlay="1" DisplaySize="0" EnableTracker="0" Mute="0" PlayCount="1" ShowDisplay="0" ShowGotoBar="0" ShowStatusBar="0" ShowTracker="0" ></center> <center class="style16"><a target="_blank" href="http://www.YOURWEBSITEHERE.com" mce_href="http://www.YOURWEBSITEHERE.com"><strong>Place this station on your web site or web page!</strong></a></center>

14 July 2013

Radio online Streaming Part 1

I wrote this tutorial few months ago and I guess it will be cool to publish it for the benefit of everyone who wants to learn how to setup their online radio.
TYPE 1
TYPE 2


STEP 1:  ONLINE RADIO TUTORIAL:

Hi everyone, now let me see where should I begin? Ok are you ready, relax, if you find it difficult to follow do not worry, it will be easy once you get hold of the concepts and the secret ( actually it is not a secret at all) behind this mysterious and confusing topic. Technically the steps to setup an online radio is not that difficult at all.

This tutorial shall also involve setting up shoutcast hosting server (in my experience, with RTM, it is more reliable to host the shoutcast server elsewhere rather than running your own shoutcast server. This is mainly because of certain limitation i.e. limited listeners and streaming instability and others matters concerning server maintenance and servicing. Unless you have a very big dedicated broadband line in the region of 30MB and above and of cause you need highly knowledgeable technical staffs to look after the server.

You better off in my opinion to let the server side taken care by other so that you are free to concentrate the content of the online radio rather than wasting time doing the maintenance i.e. troubleshooting and related matters just to keep the server running. Believe me, I was there before and it gives me lot of sleepless night and headache.

Just in case, you may also need to understand what is shoutcast, if you are being asked to explain later.


What is SHOUTcast?

SHOUTcast is a free-of-charge internet DJ solution. It allows anybody on the internet to broadcast live audio/shows from their PC to listeners across the globe.  SHOUTcast relies on MP3 or AAC technology to deliver audio in a live situation. If you prefer to broadcast from your pc to your listeners the information below will have you broadcasting in no time. Find more info at www.shoutcast.com.

An online radio is little bit easier to understand if you study the diagram (two configuration to choose) as per attachment (TYPE I.pdf and TYPE II.pdf as above).

The hardware consists of the following items:
a) Basic Behringer one channel microphone Model Behringer UB502
b) Behringer USB Audio interface UCA 222 (Ultra-Low Latency 2 In/2 Out USB Audio Interface with Digital Output). Please refer to attachment for more info. (for TYPE II only).
c) OPTIONAL : Desktop PC for Playlist or Radio Automation
d) Cables : 3.5mm stereo jack to TRS jack / RCA ( left and right)
e) Dynamic Microphone : Shure SM58 (made in Mexico) or equivalent
f) Studio Headphone (any good studio /semi pro headphone).
g) Active studio Monitor
h) Laptop or desktop for Audio Streamer ( win 7 OS )
i) OPTIONAL : Others accessories : guitar, sound generator…etc
The Software consists of the following:

a) Winamp Standard (go to http://www.winamp.com/media-player/all to download )
b) SHOUTcast DSP Plug-In for Winamp ( go to http://www.shoutcast.com/broadcast-tools to download )
c) Registered with free shoutcast hosting for training purposes at http://www.listen2myradio.com/ and choose and click “sign up for free account” and follow the instruction to setup the free shoutcast hosting server.

Once you have gather the above hardware and software requirement, then the following steps is to setup the said hardware and software. So are you ready to go to the next steps? Or perhaps you want to stop here for a cup of coffee, watch TV or something to relax you.

NEXT is Step 2.

17 May 2011

Procedures to setup an in-house or small commercial Radio Station


Typical Block diagram of Broadcast Radio Automation System

Introduction

This serves as a brief explanation in setting up an in-house Radio Station complete with the necessary audio/video distribution system and also an option to setup a small size commercial radio station. This simple guide however is not meant for complete or detailed procedures.

Setting up a commercial radio station involves many complicated aspects such as details engineering design, management structure, administration, program production and finances. Therefore a more thorough planning approach is required which involves complex broadcast planning and development. Furthermore it may also involve licensing issues as well as terms and regulations enforced by the current federal government.
The following pages are presented in a manner that is short, simple and in bullet point format as not to include too many technical jargons. 
If  you decides to proceed with the setting up of an in house Radio Station, it is advisable to consult a professional certified Broadcast Engineer as it may involves complex issues that need to be addressed accordingly so as to avoid unnecessary problems that may halt or jeopardize the whole project.
Engineering and Technical Matter:
Basically, an in-house radio broadcast involves two major engineering tasks mainly:
1.      Respective Studios / Suites.
    • On Air Studio (Studio I and II):

      • Ideally the on air studio shall be acoustically treated or soundproofed (insulated observation windows, Insulated twin doors). Air conditioning vent shall be located away from the microphones.
      • Suitable furniture shall be installed that are suited for studio environment.
      • The size of the on air studio varies but ideally not less than 10 ft x 12 ft. You can have a choice to either be one-man op (the main presenter /DJ operates the main audio console desk) or have separate control room (with equipment and technician to operate the main Audio console).

    • Archiving/Editing Suite:

      • Ideally the Archiving/ Editing Suite shall be acoustically treated or soundproofed. Air conditioning vent shall be located away from the microphones.
      • Suitable furniture should be installed to provide comfortable and relaxing environment.
      • The size of the Archiving/ Editing Suite varies but ideally not less than 10 ft x 10 ft. In general, it operates as one-man op where all the audio equipment placed inside the same room. The producer shall operate the mixing console themselves.

    • Recording Suite:

      • Ideally the recording studio should be acoustically treated or soundproofed. Air conditioning vent shall be located away from the microphones.
      • Suitable furniture shall be installed that are suited for studio environment.
      •  The size of the recording studio varies but ideally not less than 10 ft x 15 ft. You can have a choice to either be one-man op (the main presenter /DJ operates the main audio console desk) or have separate control room (with equipment and technician to operate the main audio recording console)
Typical example of recording Studio

  1. Studio equipment, distribution and transmission of Audio/ video within the building.

    • Audio Professional Radio Broadcast Equipment:
      • Radio Broadcast Audio Console (mixing console either analogue or digital), minimum of  3 ( one presenter and two guest) professional broadcast microphones per studio, three (3) Professional broadcast headphones, an amplifier and one set of studio speakers, one CD/DVDs player, DAT player, radio automation.
      • Optional: Logging machine or Hard Disk logging PC to record all broadcasts and usually this recording shall be retained or kept for at least 3 months. This is necessary if there is a public complaint or dispute or other matter concerning the broadcast.
      •  Optional: Radio Automation System – This is an additional requirement to provide audio source from the audio server (songs, jingle, station ID, commercial break, news etc) via computer system and can be programmed to run automatically throughout the days.
    • Audio Server:

      • Audio server is required if you install or engaged radio automation system in your on-air studio.
      • Main function is to provide audio source to Audio Automation Suite (Radio Automation System) and sound editor/recording suite as well as audio media storage for recorded material (usually from sound editor suite).
      • Connectivity to the audio server is via Cat 5e or Fibre optic cable.
      • Ideally the server or clean room should have air conditioning and security access system (preferably a dedicated room to house the servers only).
      • It should be equipped with matching U.P.S. to provide sufficient uninterruptible power supply to the servers.
      • The servers shall be installed in the equipment rack.
      • Dedicated room, size varies, but shall have enough space to house the servers and others additional servers or workstation if necessary in the future (upgrading).

    • Distribution and transmission:
      • The program output from the studio mixing console shall be routed or channeled using quality audio/video cables to the respective in-house Audio/Video equipment located inside the rooms through the ADA/VDA devices. Proper terminations of these cables with matching connectors are required.

    • Radio Automation System:
      • This system allows the radio program runs with or without producer in the studio. The professional of Radio Automation system can be very expensive (few hundred thousand ringgit). However a reasonably priced Radio Automation can be purchased via the internet. The system however shall be installed by professional broadcast personnel to integrate with the existing radio broadcast equipment.
      • Most radio automation is able to stream the audio to the internet (online audio streaming).
      • SMS facilities (optional): This is quite common nowadays where the station is able to accept sms massages from the listener. This facility can be provided by local SMS provider.
      • Email address for requests/audience feedback (preferably with internet link in studio).

    • Transmission equipment ( OPTIONAL – does not applies to in-house radio broadcast station)
      • To broadcast your program (radio output), you need to install radio FM transmitter, a limiter and FM omni-directional antenna (aerial) to broadcast the program to nearby fm receiver (FM Radio).
      • The transmission coverage area will be determined by the radiate output power of the transmitter and the type of antenna used as well as the placement of the antenna (the higher above ground level, the further the signal will travel). The higher the power of the transmitter the wider the coverage or the further the station can be heard. The transmitter output power will determine the type of license issued by the government authority, in this case, the MCMC.